Andean Plying with a Niddy Noddy
Have the covid-19 quarantines given you extra time to catch up on things you’ve long deferred? For me, it’s posting to this blog!
Spinners often use the Andean plying technique to 2-ply the singles left over on the last bobbin. I will not detail how to Andean ply here, as there are wonderful and numerous resources already available.
The issue I have with wrapping yarn around my hand to Andean ply is that the yarn invariably pulls too tightly on my fingers, or I either tire or am interrupted before I’ve finished wrapping the yarn. You can also get into trouble if you’re too lazy to split a bobbin into two and opt instead to Andean ply it. Or if you decide to Andean ply a seemingly small amount of cobweb-weight singles. I am an expert in courting trouble!
There are tools made that are dedicated to Andean plying. However, I really don’t want another clunky tool that does only one thing. If you already have a niddy noddy that has a handle that extends past the lower crosspiece, you’re golden, and don’t need to do anything extra. (Here and here are examples of niddys with extended handles; LladyLlama on Etsy sells some beautiful ones.) If your niddy noddy doesn’t have an extended handle, it’s very probable you can still make it work.
Here are my Howell and Makers’ Mercantile niddys, taken apart and assembled: (click any photo to enlarge for details)


Rubber bands are all you need to brace one crosspiece in the middle, creating a handle:


Close-ups: I used two rubber bands stacked together for strength and stability since my cross pieces are rounded.


The bottom crosspiece will be like your palm, and the top piece will be like your anchoring finger. Wrap away! No longer fear the cutting off of circulation to your fingers, or having to stop and put down your work mid-plying!


Hint: use the “sword” of the niddy to hold the yarn bracelet for plying or to store it if you are interrupted.
In the case of my Howell sampler niddy, I needed only one rubber band, doubled, to brace a crosspiece on the niddy body; but this would be best for laceweight or fragile yarn, as the yarn bracelet is only large enough to go around a few fingers.


I was able to extend the handle to make a yarn bracelet large enough to fit around my hand. I scrounged around my supplies and came up with two wooden “needles” that already had holes drilled. These work for me, but before I found them, I was prepared to drill holes in two paint sticks (the inexpensive paint stirring sticks sold or given away in hardware stores).


And I’ve since found that this method also works with my ancient Ashford jumbo niddy!

Slow-Process Beautiful Crafts
Yikes! It’s been years since my last post. These days, I’m mostly knitting with the occasional spinning, although I wish that were reversed.
By the magic of stumbling across unrelated things over the internet, I happened on this video by vlogger Liziqi, and wanted to share. Absolutely adore the little animals who follow her like Snow White!
Rasmussen Tie-Up Photo Post
Hi Everyone!
I’ve had many requests for tie-up details concerning the Rasmussen loom. I made the mistake a few years ago of over-tightening the cords that lead to the treadles. This resulted in a decreased shed. I’ve been dragging my heels on correcting that problem, so haven’t used the loom for at least three years! (And I really miss it!)
The loom is buried under lots of other things, as the quick remodel we had envisioned has stretched on much longer than we anticipated. Everything has to move from one room to another while work is being done, then moved yet somewhere else for the next job!
Without further ado, the pictures. (To see details, click for large size.)


Good luck with your Rasmussen loom!
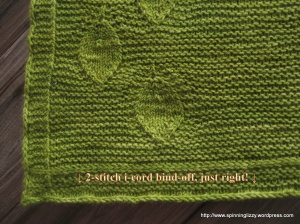
First Leaves of Spring, and A Discussion of I-Cord Bind-Off Techniques
First Leaves of Spring, and A Discussion of I-Cord Bind-Off Techniques
Did you know there are at least three different ways to bind-off with an i-cord edge? Why would you need more than one?!
This is Laura Aylor’s elegant “Woods in Winter” pattern:

The pattern as written calls for a simple bind-off, shown here:


Reflecting over the original bind-off overnight, I decided the next morning I really wanted an i-cord bind-off to match.
Bind-off C:
Cast-on 3 stitches
*(K2, K2Together, transfer the 3 stitches from R back to L needle)
Repeat *
When 3 stitches remain, K3Tog, cutting yarn and pulling through.

After finishing a 3-stitch bind-off (the other two edges are in 3-stitch i-cord), it seemed to me that this edge looked too puffy and large compared to the other two. Also, I noticed this bind-off had an underside (which shows on the right-side of the knitting) with a “laddered” stitch pattern. It would be very pretty in some knits, but doesn’t match this pattern. And finally, the preceding rows of all purl stitches (on the right side) made it look even more chunky.
First: ravel the purl stitches and re-knit the last row so there are 2 rows of knit stitches on the right side before starting a bind-off.
Here is the result of testing three different bind-offs, using only 2 cast-on stitches this time:
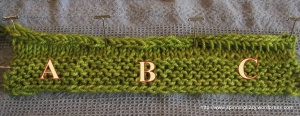

I-Cord C bind-off:
Cast-on 2 stitches
*(K1, K2Together, transfer 2 stitches from R back to L needle)
Repeat *
When 2 stitches remain, K2Tog, cutting yarn and pulling through.

I-Cord B bind-off:
Cast-on 2 stitches
*{K1, K2Together through back loop, transfer stitches from R back to L needle}
Repeat *
When 2 stitches remain, K2Tbl, cutting yarn and pulling through.

I-Cord A bind-off:
Cast-on 2 stitches
*[K1, Slip1, K1 and pass slipped stitch over, transfer stitches from R back to L needle]Repeat *
When 2 stitches remain, K2Tbl, cutting yarn and pulling through.
Bind-offs A and B were similar, but I felt that A had a slimmer, flatter shape, which better matched the other two edges of my shawl. With a different pattern, if it did not matter, I would choose B, as it is much faster for me to knit!


No Yarn Left Behind
Salvaged Gold Vexillum, aka “Yarn Chicken Knit”
Go ahead, dare me. I can’t walk away from a challenge of yarn chicken. I’m not sure I know how. I so dislike “wasting” any extra yarn, that my mistakes tend toward knitting my projects until the finished pieces no longer look fitted, and are a tad too large. But this is not usually a problem with accessories like scarves.
I had 550 yards of Blue Moon Laci yarn left over from the 1750-yard skein used to knit Tropfen for my husband.
This yarn, in the colourway “24 Karat”, is so luscious, I wanted to steal his scarf many times over, so the leftover yardage were destined to become something for me. Enter Vexillum, by Paper Moon Knits.

The pattern calls for fingering yarn, but my yarn is laceweight. Fortunately, I had a lot of it, and all was well until approaching the finish line. I had weighed my remaining yarn many times to guesstimate how much to leave for the i-cord bind-off, although I did have a few strange readings when getting toward the end of the skein. For instance, how could I weigh the remaining yarn at 5 grams, only to knit an additional four rows and read the next weighing at 7???!!!
Nevertheless, during my Friday morning knitting group, I definitely had enough for the i-cord bind-off, but talked myself into knitting an extra two rows first. “Yarn Roulette,” a friend told me I was playing.

I had my extra rows completed by the time I joined a second knitting group Friday evening, and proceeded to bind-off. However, nearing the end of my yarn, it was obvious that it would not be enough to finish. Fortunately, I had a trump card: a precious butterfly of yarn left over from my Tropfen project:

I was dismayed to find that it was not long enough! My fingers shaking with anxiety, I found a last meager bit of yarn wound on little card. This was a lease tie on the original skein. It was so small, there was no real reason why I kept it! One friend noted helpfully: “You could always hack off a little off the end of your husband’s scarf and use that!”

I parsimoniously spit-felt-joined this last fragment of yarn, regretting my earlier squandering of possibly five inches of my yarn butterfly with my preferred Russian join. More stroke-inducing binding-off later, I was devastated to acknowledge that I still did not have enough to finish the i-cord bind-off. I finished the last 1.5 inches with a basic bind-off. It was a relief be able to finish the scarf, but where was the gratification or triumph?

Two hours later, back at home, my son was pushing around something on the floor with his toes. “Mama, is this garbage?” “Nooooooooooooooooooo!” I snatched this precious salvage from him the moment I recognised it for the gold it was: a scant 9″ of my yarn! Hero of the hour! I’m still a contender to challenge the yarn again!

Half an hour of undoing two inches of bind-off later, I spit-joined a scant inch of my wisp of treasure to that tail, and joined the other end to the leftover tail still attached to my cast-on edge. I bound-off warily, praying over every stitch, and… success!
My nerves were so frazzled that I broke apart the joined cast-on and bind-off tails at midpoint before thinking to photo that epic moment. Less than four inches left at each end to weave in!
I don’t think I’m much wiser or repentant, but… I AM still undefeated at yarn chicken! Victory!


Homemade Magnetic Knitting Chart Keeper
Here’s my inexpensive, lightweight, and portable magnetic chart keeper that won’t break the bank if it’s lost, or you need more than one!
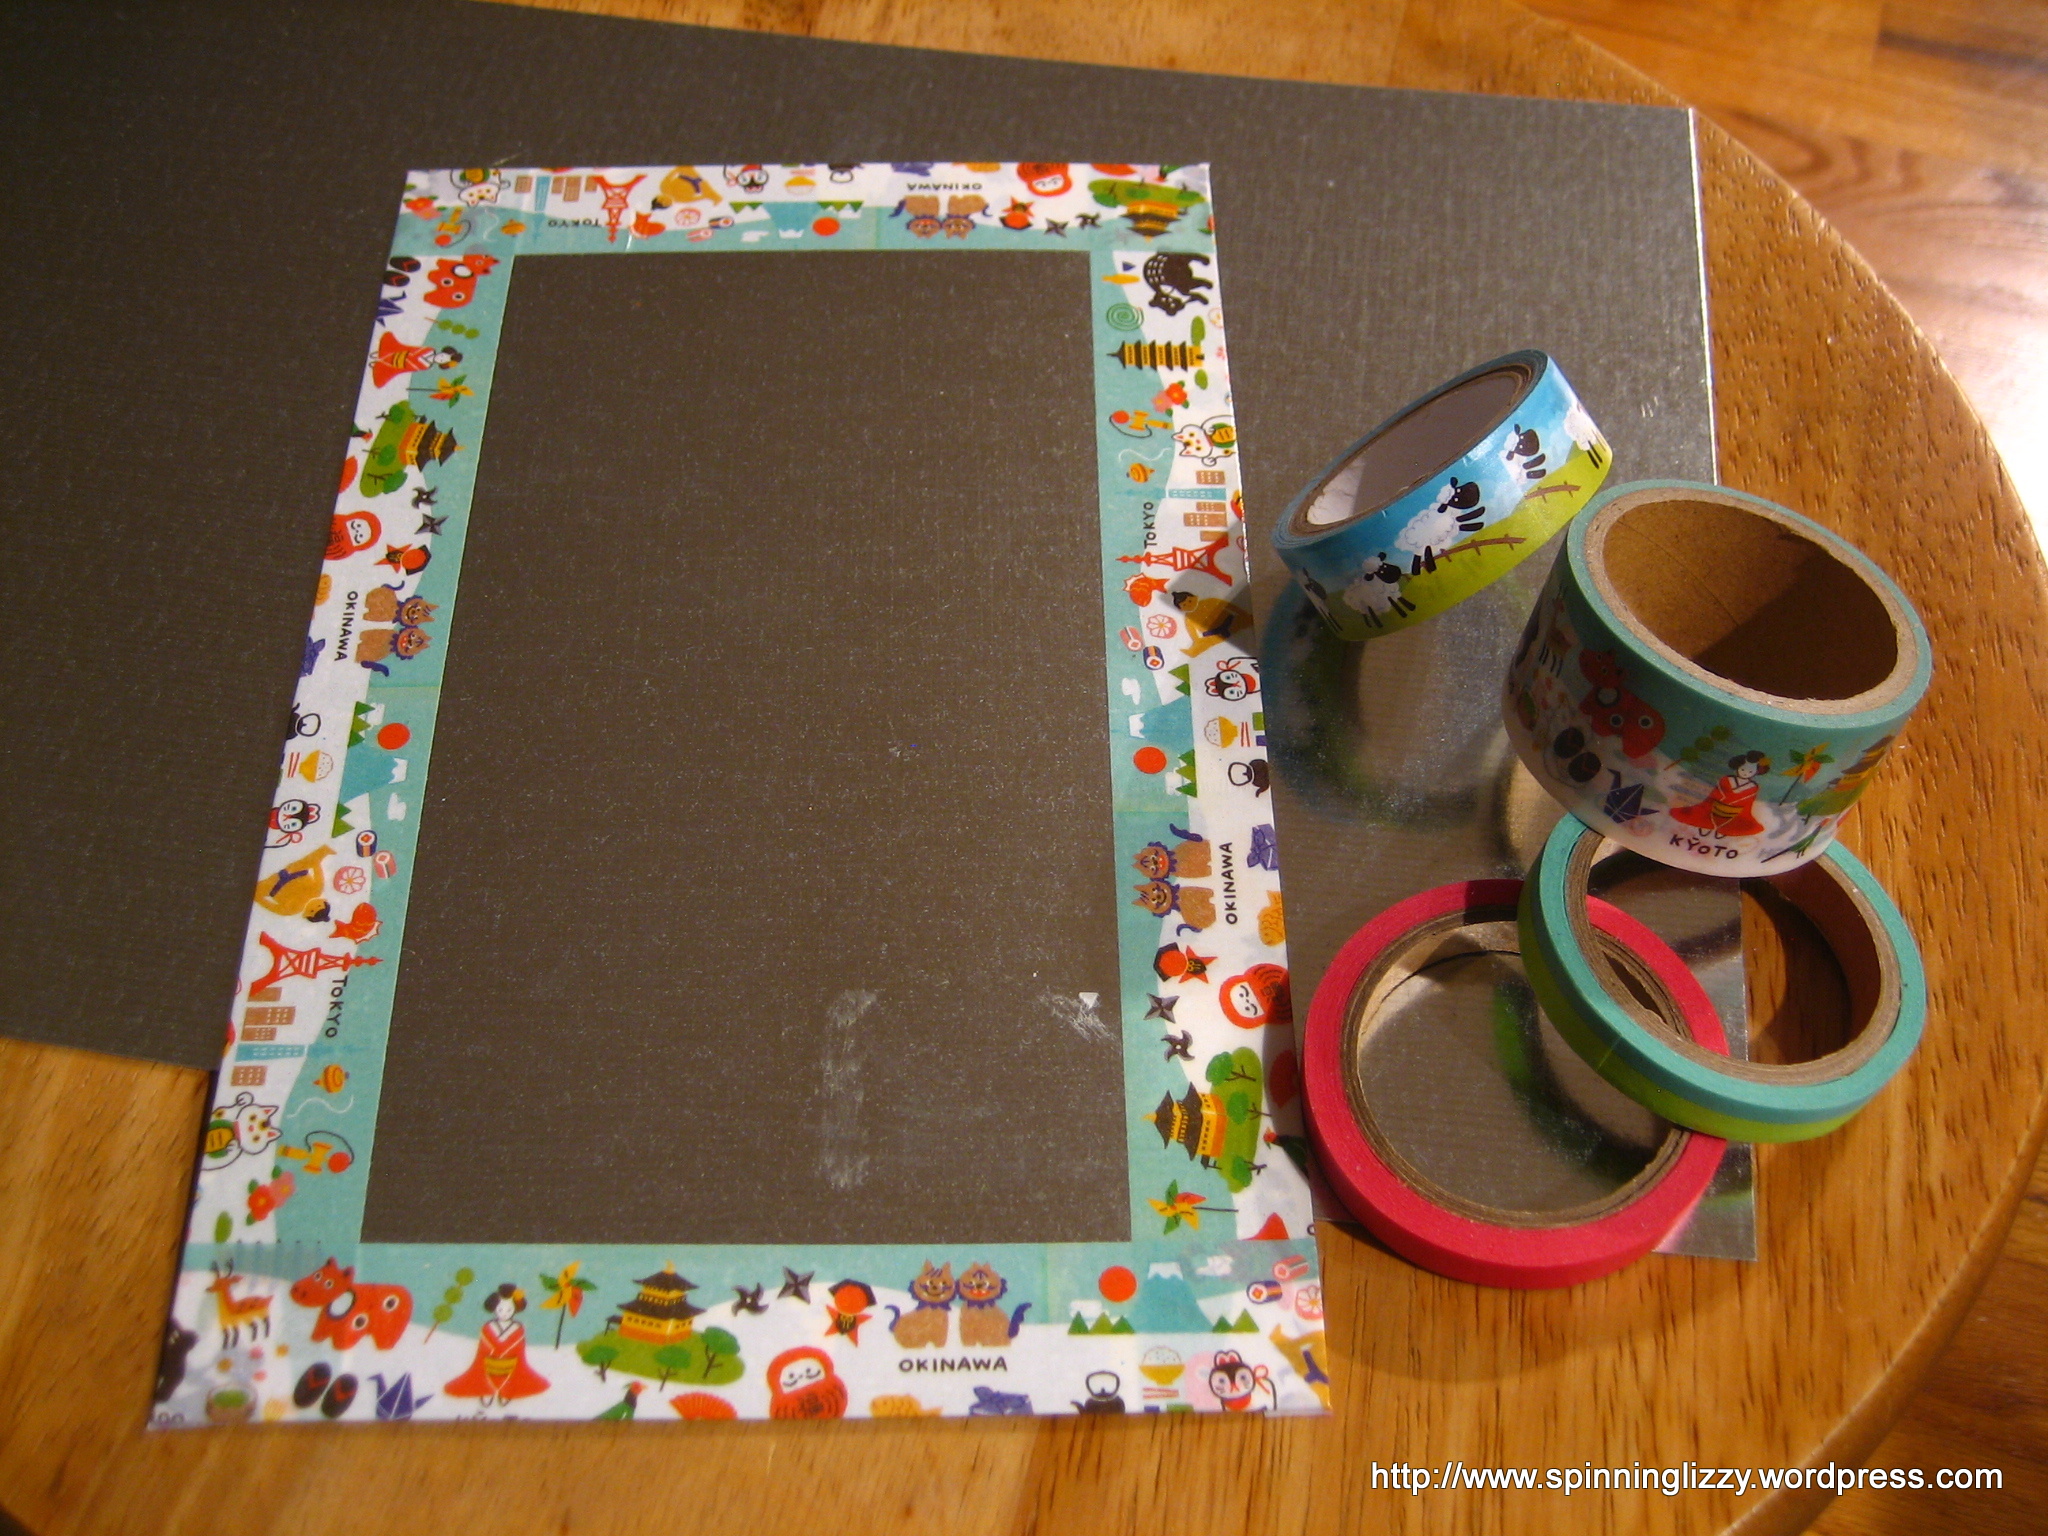
I purchased the washi tapes (Japanese patterned masking tapes) at Daiso, but I’ve seen them at many different craft stores as well.
The magnetic backing is galvanised flashing, which I purchased at my local hardware store. The smaller sheet, which fits a quart-sized ziplock plastic bag, was only 55 cents. The larger flashing (fits a gallon ziplock) was less than a dollar. The large one also fits into a standard plastic page protector.
I taped all of the very sharp edges for safety!
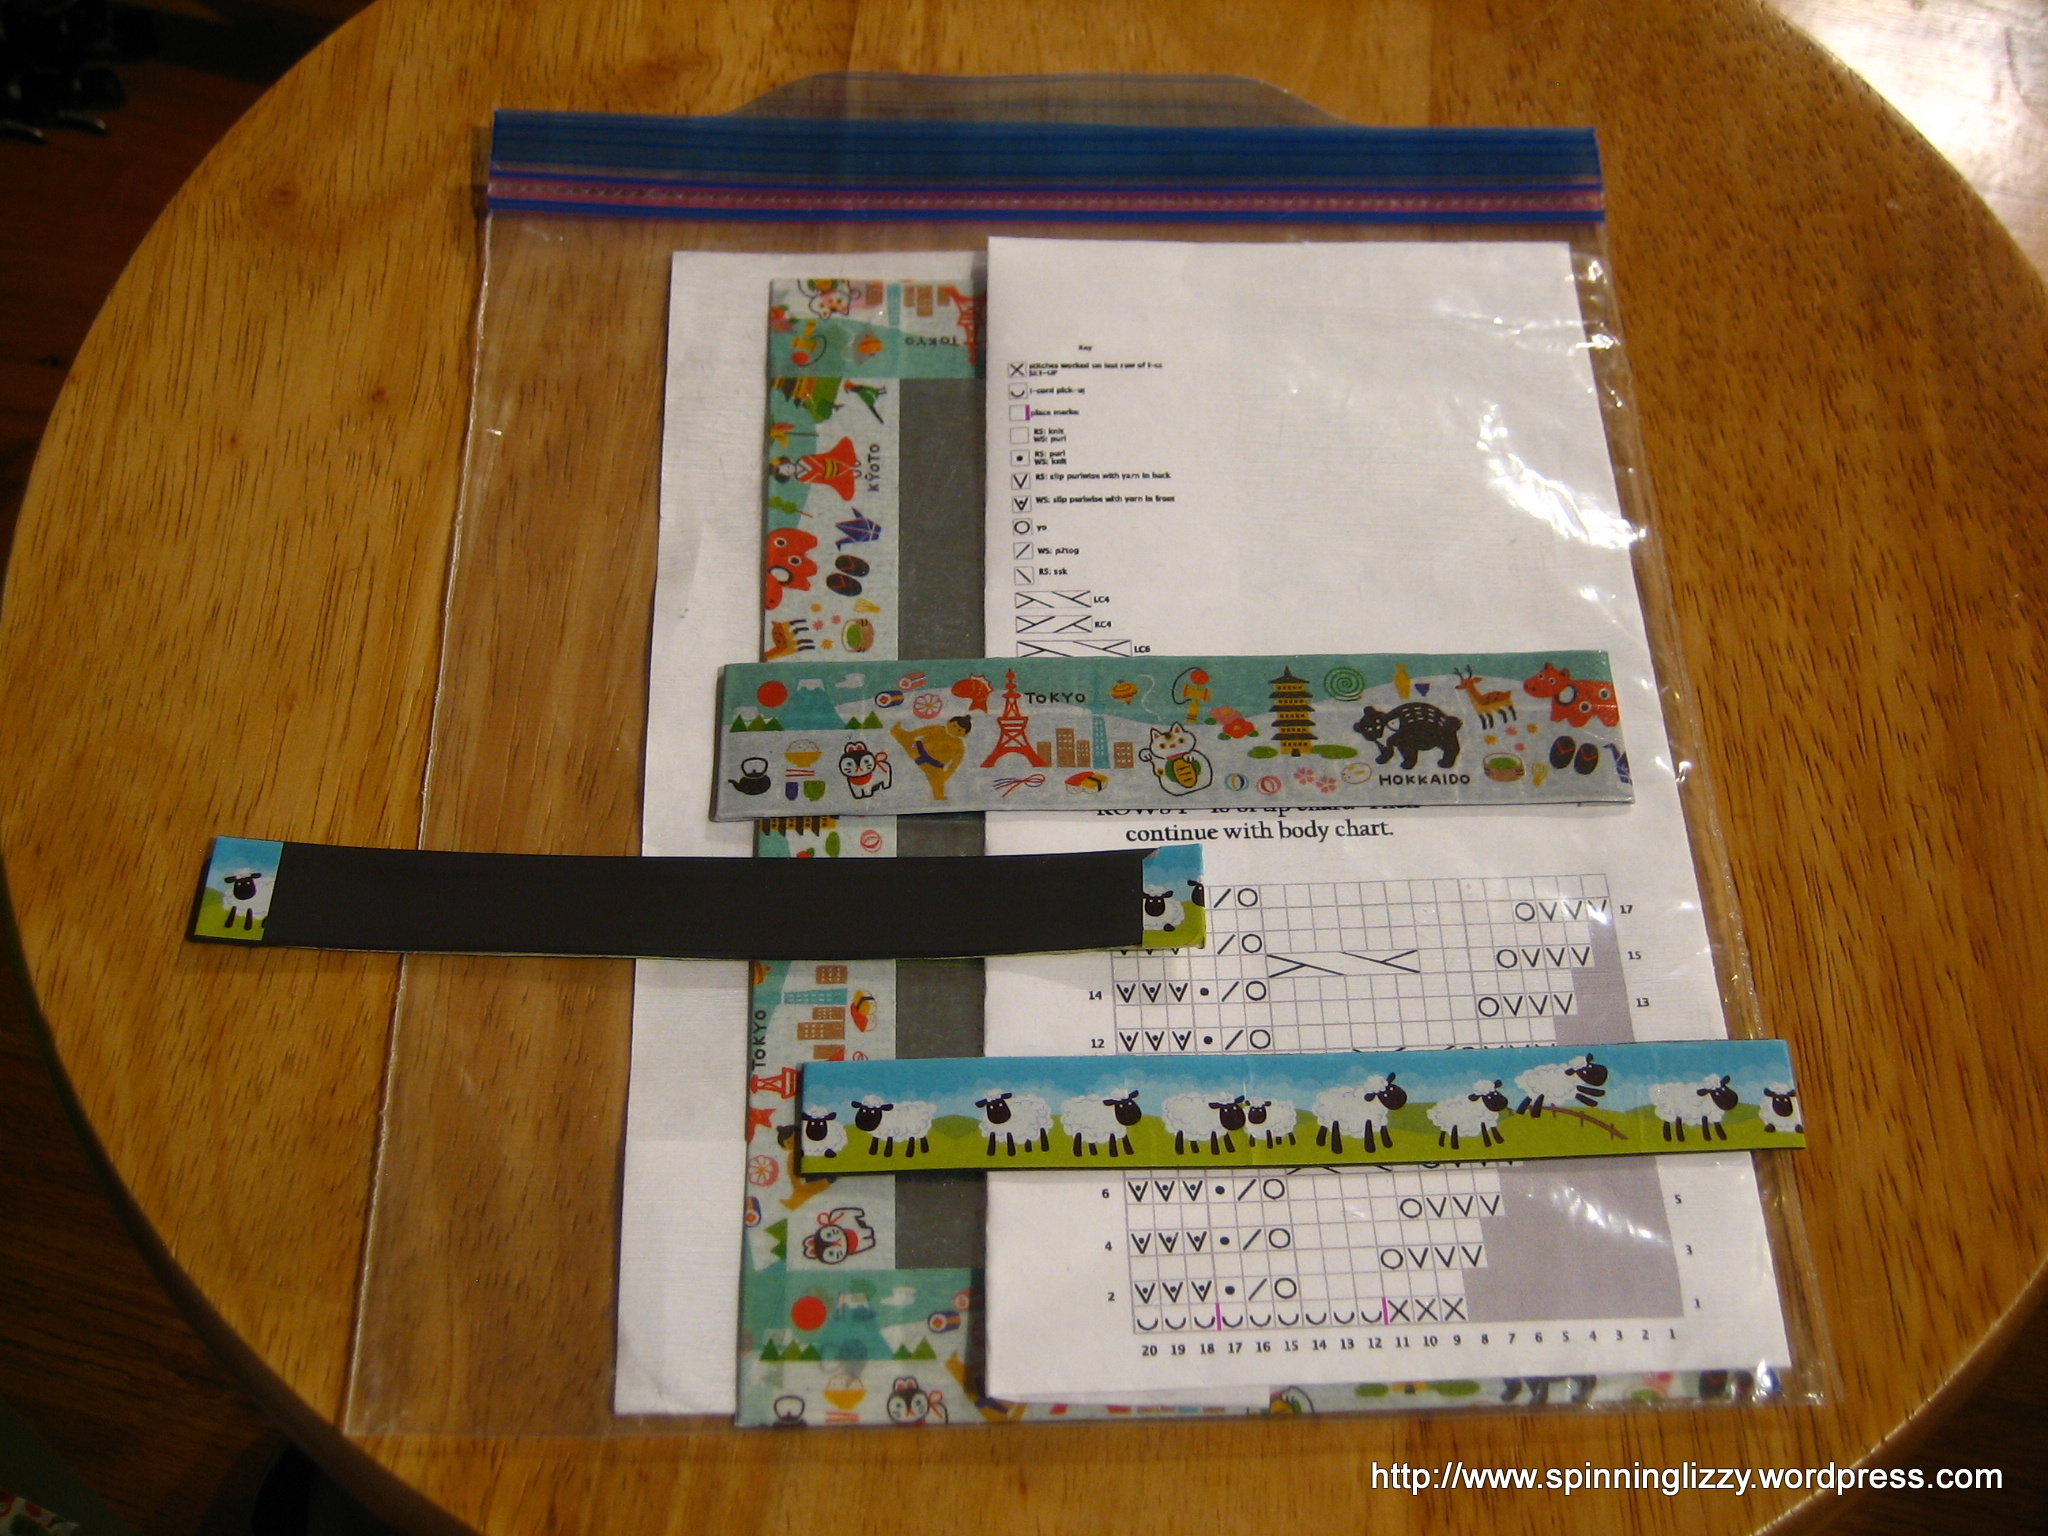
The magnetic strips (also found at craft stores) came in a roll, have adhesive on one side, and are easily to cut to size. Cover them with more washi tape (or ribbon) for prettiness to enjoy!
Timely Mitts
Have I mentioned that I once started a pair of socks (two-at-a-time) on circulars, put them away and lost them for a while — then after searching found two exact same sets of these socks worked in the exact same pattern, and also the exact same yarn? Until I found the second pair, I had no recollection of having begun them! They are still unfinished, and both pairs lost again. I’m a bit worried that if I look for them again, I may find a third set! Or, perhaps unfinished projects that hibernate long enough begin to procreate!
After the double set of sock incident, I’ve taken to knitting only one project at a time. And so, I have been knitting Tropfen (Ravelry link) since February, but have only made it almost halfway through the main part of the pattern.
I’m still pretty faithful to my Tropfen scarf, but knitting lace weight on size 3 needles (I made a false start, knitting about a foot in size 0s before switching), but I really needed the encouragement and gratification of finishing something fast. Enter the Rock Strata Mitts (Ravelry link).


Using some of my recently-finished handspun yarn, and even at my very slow speed of knitting, it has taken me only four days for me to complete these!


It feels fantastic to finish something, and I’m psyched up to continue on with Tropfen.
Not A Happy Camper
Dear Reader,
It’s been two years since my last post, not for lack of words, but time. Looking in my draft folder, I find I have almost a dozen posts in various stages of completeness. A friend urged me: “Just publish them, even without photos!” So here is my first post without photos. I’ll try to find time down the line to add them in…
This post was mostly written six years ago:
Eight years ago, when I learned how to spin on a drop spindle, I was very sure it was adequate for my needs, and I did not ask anyone in my spinning group to let me try out their spinning wheel. What would be the point, if I never needed a wheel?
So, when I realised the error of my ways (within a couple months!), my first time trying out a spinning wheel at a store was also my first time sitting at a wheel. That wheel was a Louet Victoria, and I learnt enough, an hour later, (learning to spin on my own, as the store kindly left me to my own devices), to determine that the Victoria was too small and expensive for my needs.
At another store, I tried out a Lendrum DT, and thought it spun very well; after having cut my teeth on the Victoria, it was too easy, and… shouldn’t there be more pain and learning curve to this learning process?! The saleswoman at that store mentioned the existence of walnut Lendrums, in the “they’re not available, to anyone” tone of voice, sniff sniff. I have no idea why she brought up the subject, as I had never paid attention to Lendrum wheels, any sort of Lendrum, prior to that day, and certainly didn’t know enough to ask. I didn’t purchase a wheel that day, because Lendrums were backordered with a wait-time of up to a year. But, to be honest, the price of a new wheel was also too far beyond my thinking as to what I wanted to spend.
I began to pay attention to advertisements for second-hand wheels, and my first was the trusty Ashford Traditional. After a month-long flirtation with the Traddie, I found, purely by luck, a walnut anniversary Lendrum DT in an essentially unused, new condition!
The Traddie was fun, but wasn’t fun to tote around in the car, to spinning meets. It had come with only the basic ratios, so I had to decide if wanted to spend the extra money to upgrade the Traddie, or put that money into a more modern wheel. I sold the Traddie, due to lack of space. (I have to laugh now, as I look around at the looms eating up every available inch of room!) The Lendrum was easier to go out with, and life was grand. Why did people need more than one wheel, anyway?!
A few months later, I met some new spinners at a fibre day at a wool-processing mill — and saw another walnut Lendrum! I asked the owner how long she had had hers (I don’t know why I assumed she had acquired hers second-hand, as I did), she looked to at the golden plaque (found on the front of all walnut anniversary Lendrums) and told me, “since they came out in 2001”. (By the way, I wasted ten minutes searching the internet to come up with that year, before padding the few paces down the hallway to check out my own!) I was aghast. Her walnut was faded, dented, and generally looking like an aged beauty whose best days were clearly in the past, nothing like the deep, glossy shine of my own. Is that what happens to a walnut Lendrum that goes everywhere? When it rained at the end of a spinning workshop I took, taught by Judith MacKenzie-McCuin (JMM), she helped me put a plastic cover over the top of my wheel, which stuck out a few inches from my makeshift spinning-wheel bag (a canvas artist’s box-easel backpack). When JMM said, “you need to be extra careful with walnut in the rain; any water drops that get on it will leave spots on the wood,” the days of leaving the house with my Lendrum became numbered.
I thought I could muddle through by getting a proper carrying bag for it. But I couldn’t stomach the expense of a new bag (used bags were simply not available!), which wouldn’t cost me less than $100, but probably closer to $150. But even for that price, I couldn’t find a trim and tailored bag that met all my requirements. My easel-box bag was both those things, except for the two inches of wheel it failed to cover, and except when it rained. (Ha! I live in the drizzly Pacific Northwest.) I would make my own bag, I thought. I’m not proficient at sewing anything but straight lines, but I thought I could do it. After spending many hours designing the bag, I psyched myself out at the prospect of sewing curves, and couldn’t bring myself to make the first cut into the the fabric I acquired for the project.
It also became apparent to me that, at close to fourteen pounds (more, with accessories), the Lendrum pushes the limit of easy portability, although its bulk, rather than weight, is the greater encumbrance. I needed a smaller wheel. But, not just any smaller wheel. I also needed high ratios, because anything slower than 20:1 means I wouldn’t enjoy spinning long-draw. There’s a charming, ultra-portable wheel called the Pocket Wheel, but it maxes out at a low 13:1 — a starting point ratio for me.
Then in 2009 February, a solution presented itself to me in the form of a Louet S45. The previous owner bought it new, but had barely used it. It took me a couple of months to tweak it by replacing the two ball-bearings on the flyer and a crosspiece with two spring-mounted bearing balls (used as a lazy kate to mount bobbins); but it soon spun perfectly. It’s a little dynamo, and an engineering marvel, with the only drawback of maxing out at a ratio of 20:1.
The S45 flyer assembly with thread guides is simply genius. After I grew accustomed to using the delta flyer, I truly appreciated the ease of threading the flyer.
A ball bearing on either side holds the bobbin in place for plying. I talked to Louet, and they said the inner measurement of the bobbin was engineered to be 1mm smaller on one side, specifically so that the bobbin would stay in place. Amazing craftsmanship!
For a travelling bag, I found a collapsible, soft-sided food cooler with rolling cart from Costco for $20. The S45 is squat and pyramidal, and does not require any extra time to set up. I find it very useful at home, as I can easily tote it to any spot where I want to spin. The Lendrum is parked in its little nook, too unwieldy to move about in my crowded house, but always ready when I want to use the VFF.
The Lendrum’s Very Fast Flyer (VFF) includes a respectable 44:1 ratio, but in general I’m afraid to treat myself to using it. Recently, I spent several hours spinning laceweight singles with the VFF, but afterwards couldn’t get my S45 to work properly spinning something similar; I thought it was somehow broken. Investigation showed that I had mistakenly set the Lendrum’s VFF at 44:1 rather than 26:1; and the S45’s upper limit of 20:1 just couldn’t compete. It took a bit of retraining, spinning lots of thick singles, for me to be happy with the slower wheel again. Spinning frequently on the Louet S45, I discovered what well-built, rock-solid construction it has.
The S45 in a rolling cooler bag was supposed to set me free, but I had problems when I towed it over three blocks of clean city sidewalks. I pulled my back out of alignment, and it took a visit to my doctor to straighten that out. When I found that the S45 was no longer being manufactured, I felt again the same angst of owning another wheel that could not be easily replaced. And again, (being completely neurotic), I could not enjoy bringing it out to spin in public where it might be assaulted by an unlucky event (a raindrop, sticky fingers, a harsh glance…).
What does this have to do with camping? Sometime during the days before having a child, I made a somewhat vague, if rash, promise to go camping if we had a son, on the premise that it is supposedly a rite of passage into manhood. (Now that I think of it, I don’t think it was actually a promise, more a capitulation under duress…) Our son has now lived eleven years without having undergone that dreaded ritual (although I did agree to backyard camping this summer, and have suffered through three summers of cub scout day camp), and the noose is closing about my neck. Let me clarify this by stating that I am a city person and homebody, and my idea of camping would be staying at almost any other place than home. To make matters worse, I think I may have also agreed to something about fishing. Frankly, I don’t see the point. There’s so much else I want to do, and, having a child (definition: force of nature into which all time and energies gravitate), so little time. There’s simply not enough time for me to sit at a lake in the middle of nowhere, dangling a sacrificial worm impaled on a hook tied to a line attached to a stick on the off-chance that some hapless fish might laugh so hard at the setup that he’ll decide to commit suicide. I don’t even like to eat fish, and besides, there are these things called supermarkets… And don’t get me started on flying and biting insects. I seem to broadcast “bug bait” from every pore.
Before you think I’ve gone loopy with this digression, I am actually trying to get somewhere. In my family, I am the one who is relied upon to assemble or install anything, from toys to bicycles and software. We have a GPS on loan to us from a friend; while it would be wonderful for my husband to use it to find his way home on his own (I rarely get lost, and don’t really need it), it would require his actually exerting himself to turn it on and input an address. Here’s a true story: Once, I fell asleep on a subway ride from New York City to the airport. I woke when I heard the announcement that we were nearing the end of the line, at Rockaway. I was astonished that we were at the farthest point away from our destination, having boarded the train going the wrong direction, and that it would take more than an extra hour to backtrack and reach the airport. My husband had such belief in my navigational ability, he never questioned our route, even though we were sitting directly across from a subway map! Another true story: After living in Seattle for several years, and having in that time had occasion to travel both north to Canada and south to Portland numerous times (it’s different directions on the same highway), I once fell asleep right after leaving our house, and again awoke to find that my husband had been blissfully driving to Portland when our destination was Canada! Try as I might, I have not been able to dispell the myth pervading our family that my presence would be needed to provide shelter (set up a tent), sustenance (find the ignition switch on the campstove), and navigate our way home from camp (follow the exit signs from the parking lot). My attempts to negotiate a loophole or moratorium to this impending camping/fishing nightmare has only resulted in the concession that a portable spinning wheel might well smooth the way toward my not being completely unbearable company during such an outing.
The S45, being slightly chunky, as well as difficult to replace, loses it status as a portable wheel that wouldn’t make me more neurotic from protecting its pristine excellence. So, in 2010, I was forced!, to order another spinning wheel, a Louet Victoria, and I had to order it brand-new. Brand-new prices are simply unbelievable (again, I was forced!), with steep depreciation for resale, while used-wheel prices keep their value very well. Because I wanted the oak rather than beech model, I had to wait a month after ordering it to receive it. Just before ordering it, I came across a little-used, oak Victoria with high-speed kit for a decent price, but because Vics that were made more recently have some improvements that models older than eight years do not have, DH insisted on the purchase of a new one to forestall any renegotiations on my part.
The last Vic I saw in person, made of beech, was the one I first tried one out at a store, years ago. Since receiving my own oak Vic, I am surprised to see so much variation in appearance from one oak wheel to the next; due, I suppose, to its its oak veneer over MDF (medium density fibreboard) construction. I’ve seen other oak Vics which I did not consider beautiful (again, the chance of veneer), although I am happy to say I love mine. I wonder if the beech Vics also have as much variance.
The Vic is small, and has the awesome mechanical construction I’ve come to expect in a Louet. It’s top ratio of 20:1 is similar to the the S45, although the S45 is a more stable and solid spinner. At ten pounds, it’s still not as lightweight as I’d like, but there are no other (non-electrical!) options available that would be an improvement. I have taken the Victoria with me as carry-on baggage on an international trip, and found it travelled beautifully, albeit still a bit heavily. I’m happy to say it went through Seattle-Tacoma TSA security with flying colours. The two TSA agents examining the x-ray took their time, and one asked me, as if to settle a bet, “Is it a spinning wheel?” I was relieved not to have to take the wheel out to prove it!
As the third wheel in my house, I keep the Vic always in its carrying case, so I can grab it and run out the door at a moment’s notice. How lazy is that?! It’s a great portable wheel, although I don’t think it’s the perfect wheel for camping.
With ever-more affordability of battery choices, it seems that a small electric spinner might be the most portable route, but I don’t think I can push my luck. Especially since I’ve recently rediscovered how much fun spinning on a drop spindle is. There is such a Zen to spinning, and I’ve been enjoying it even at the drop spindle’s leisurely and rustic pace. Which is more than I can say for camping.
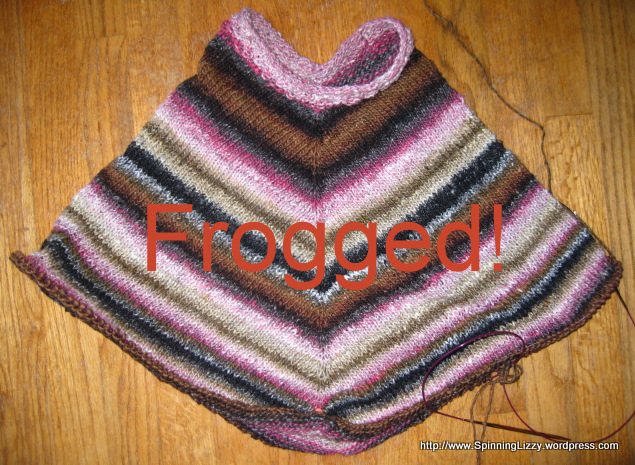
Noro Taiyo Poncho And A Lesson Learned
Here is another gift of designer yarn that, left to my own devices, I might never have found my way to experiencing. I have recently been consumed with knitting, and find I spend an inordinate amount of time knitting, frogging, and re-knitting. I’ve come to the opinion that spending so much valuable time to knit something from an idea into existence deserves yarns that are “perfect”, rather than “make do”, even if it means having to splurge extravagantly. For now, as my stash still brims with gorgeous gifts, I am diligently divining their perfect destinies; but I do look forward to Some Day, (when said stash is under control), when I may finally choose the project first, and only then shop for the ideal fibre to suit.

Comprised of cotton, silk, wool, and nylon, Noro Taiyo has some very natural colourways; and I can see myself in this rustic, bohemian yarn, curiously named “Colour 1”. This yarn is a good representation of me, as all my eye, hair, blush, and skin tones may be found in each skein.

I decided to use Taiyo to knit my latest adventure, Stephanie Pearl-McPhee’s poncho.
The pattern calls for increases made to both sides of a centre knit stitch. I wanted to eliminate the holes created by yarn-over (YO) increases, so made the change of using make ones (M1) rather than YOs. The M1 increases are made by picking up the bar between stitches, and knitting into the stitch. This project gave me lots of practise in knitting M1R (make one right, right leaning ) and M1L (make one left, left leaning) increases. To remember which way to knit them, I found the notes from the Jimmy Beans Wool site very helpful:
M1L – pick up front to back, knit in the back – front, back, back
M1R – pick up back to front, knit in the front – back, front, front
For such a very simple knit, it seemed as if I would never have it right, and finish; I knit and frogged the neckline three times before settling in to knit the body. Because the yarn is predominately cotton, I imagined it would stretch, and so knit the fabric a little tighter to compensate.

When I had knit up two skeins, I had to admit to myself that the resulting stiff and thick fabric was far from what I hoped for: which was a stretchy, drapey, summery cover-up to throw over beach attire when convening with friends around an evening campfire. Just thinking of it, I can hear the laughter and gentle banter, against the background of snapping flames, the scent of burning wood resins, and the feel of the sand’s grit through my fingers. Clearly, this uncooperative cloth was not sharing my reverie! Well, perhaps the yarn did envision the sandy beach in one respect: for intermittently trapped in the yarn were rough bits of straw, bark, and the occasional flake of mineral that had to be tweaked out. Every skein seemed to have at least a dozen such detritus to contend with. This is rustic yarn, indeed! At this point, my project had enough length to be finished as a short poncho, and both DH and DS were loath to (and horrified by!) my resolve to raze two weeks of work. Fortunately, I wield the needles, and had the last word.
I made the neckline even larger the last time, as all of the previous attempts had collars that were too close and warm against my skin. I also switched to larger (US size 10.5) needles for the body of the poncho. It is slightly larger after washing and blocking, and I hope it won’t continue to stretch. There is a little wool in the mix, so I might attempt to full the garment slightly at some point.
I did not want the fringe of the original pattern, so used six rows of moss stitch in the neckline and hem to keep the stocking stitch from rolling up. The entire poncho used three-and-a-half skeins of Taiyo. Worn normally, the sides fall slightly below my elbow.

For a different prospect, I could keep both arms out of the cold (sporting a horizontal striping), by wearing the poncho sideways.

Turning the poncho so that it falls rakishly asymmetrical is my favourite way to wear it. The collar falls a little like a cowl, one arm stays warmer, and I feel oh-so-boho-chic sporting it thus!

To my chagrin, I did not think to check the order of the M1 increases until after I had blocked and dried the poncho. It seemed obvious to me that all stitches to the right of the centre knit stitch lean right, and all the increases to the left… lean left. None of the sources I checked to learn the M1 stitches made any comment, although a couple did generally list the order as M1L, K, M1R. In my convoluted wisdom, I, who have more fingers than finished knitted projects, thought it seemed more logical to knit the increases as M1R, K, M1L. It did not occur to me until a week after finishing the poncho to knit up two swatches for a visual examination of the differences (I’ve exaggerated them a tad by bunching up the sample on the left):

As you can see, the middle column of knit stitches in the swatch to the left has a more pronounced definition, while the one on the right lies flatter. Also on the right, I think the columns of stitches branch to the sides in a more crisp and angular rather than curved fashion. Here are the samples again, (left one not bunched this time), this time with my poncho:

I wish I had thought to check these increases before starting the poncho, but the difference is not so striking that I feel the need to re-knit it!
A Captivating And Suspenseful Knit
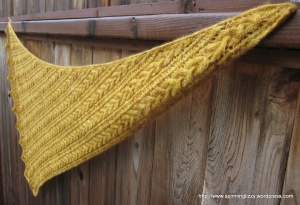
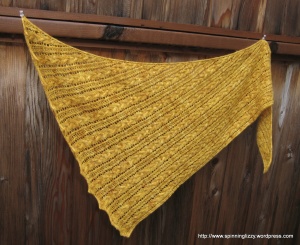
A friend gave me three exquisite skeins of Alchemy 100% bamboo yarn in the 62c Resolution colourway, and I’ve visited and petted this yarn many times in the three years since I’ve had it, waiting for the right project to present itself.

This project had to meet three criteria: first, the pattern must showcase the elegant beauty of the gorgeous hand-dyeing (with very short colour repeats); second, not be too small; and third, us as much as possible of the stunning yarn.

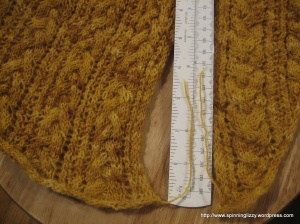
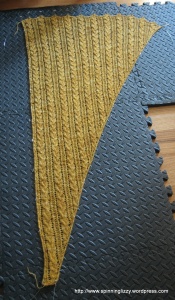
Clearly, something lacy and elegant, without being too busy, was in order. Enter Clapo-ktus, a hybrid of Clapotis and Baktus, The lacy effect comes from purposely dropping stitches between ladders of stocking stitch. The scarf is triangular, so the trick to using up all the yarn is to weigh the yarn before you start knitting, then several times along the way towards the midpoint of the triangle, until half the yarn is used up. At that point, you stop increasing and begin the decreases back down to the other small corner of the triangle.

In theory, it seems easy enough, but I suspect my gauge changed during the knitting, muddling things considerably. I nearly had heart failure, knitting to the finish, awash in anxiety that I would run out of yarn. (It has been discontinued, and more was not to be had! And even when it had been available, it had cost a fortune! Even if I had a fortune to ransom another nonexistent skein, the dye lots would not match, and I would have too much left over!) When I was nearing my mid-point, I made the decision to allow an extra four grams of yarn over the requirement for the second half of the knitting. It had been an agonising decision to make, because I certainly did not want even one extra gram of this precious yarn to go to waste, let alone four. I’m glad I did that, for even with the generous allowance, all that remained at the end was a scant 11″ wisp of yarn. Who knew that 150 grams/450 yards of yarn could provide more heart-stopping action that left me gasping for breath at the end more than reading or watching any thriller might have!

This project taught me how to twist my stitches, from both the knit and purl stitches, and how to identify such stitches by sight.

The bamboo yarn bled so much when I washed it (with a spoonful of Synthrapol in the wash), I worried the deep berry colours would wash out.

Blocking the scarf was necessary to complete the lacy look. While knitting, I purposefully made the selvedge stitches looser, but even so, this bamboo yarn does not stretch like wool, so the edges limited how aggressively I could block open the scarf.

You’ll notice the colourful foam tiles on my floor. They were installed when my son was a baby, and even though he has long outgrown the need for them, I’ve kept them for him to jump around on when playing video games, and (more importantly) because they are the perfect area for blocking my knits!


This bamboo yarn knit up like silk; slinky, shiny, but not stretchy. The resulting fabric drapes beautifully, and the shawl is perfect for summer.

